1. Purpose
Risk assessment is a vital process that CECS will undertake to ensure the safety and well-being of its faculty, staff, students, and customers. It is the process of identifying, evaluating, and prioritizing potential hazards or risks in a workplace or activity. A risk assessment is crucial because it helps organizations understand the level of risk and take appropriate measures to control or eliminate the identified risks.
2. Scope
In the College of Engineering and Computer Science, there are thirteen teaching laboratories. This risk assessment applies to all laboratories.
3. Procedural Principles
Each laboratory personnel must be familiar with the contents that pertain to his or her workplace and the procedures for obtaining additional safety information needed to perform his or her duties safely.
In order to keep the contents of this manual up-to-date with current regulations and best practices, this Risk assessment may periodically be rewritten, with added or deleted sections. Comments and suggestions for improving are welcome and encouraged. Please send comments to:
| EE&CS Laboratory Coordinator | ME Laboratory Coordinator |
| Truong Tuan Vu
Phone: 0376200891 E-mail: vu.tt@vinuni.edu.vn |
Pham Van Kiem
Phone: 0988379786 Email: kiem.pv@vinuni.edu.vn |
4. Procedural Statements
4.1. When to carry out risk management
Risk management needs to be carried out when:
- Tasks involve risks;
- The legislation requires it;
- Using new equipment or substances;
- There is a change to existing work practices;
- A new risk becomes known;
- An incident has happened;
- There is a change in legislation.
4.2. Who should carry out risk management?
Supervisors maintain responsibility for health and safety hazards in the area(s) under their control. Supervisors can delegate the task of completing the risk management form to other members of staff or PhD students, so long as the person they choose has:
- completed the health and safety awareness online training course, and
- demonstrated an understanding of the risk management procedure; and
- experienced in the particular work area or equipment. Supervisors who have the authority to implement the necessary safety controls in the area where the task or activity is undertaken maintain responsibility for the process and must sign off on the risk management form. All risk management forms must be authorized by the supervisor unless they exist as reference material or as shared resources.
4.3. The step-by-step process
The risk management procedure follows 4 steps:
– Step 1. Identify Risk/Hazard;
– Step 2. Assess Risk;
– Step 3. Control Risk;
– Step 4. Review control measures.

Figure 1: The risk management process
4.3.1. Step 1 – Identify Risk/Hazard
Mark off known risks of the hazardous agents, processes, and equipment (Figure 2). Use this list as a tool to help complete the risk assessment in step 2.
Figure 2: The Risks/Hazards list

4.3.1. Step 2 – Assess Risk
Fill out the risk assessment form (Table 1) using 5×5 Risk Assessment Matrix tool (Table 2) to score your hazard or activity’s risk while performing a risk assessment.
Table 1: Risk Assessment Form

A 5×5 risk matrix is a type of risk matrix that is visually represented as a table or a grid. It has 5 categories each for probability (along the X axis) and impact (along the Y axis), all following a scale of low to high. As a comprehensive tool used by organizations during the risk assessment stage of project planning, operations management, or job hazard analysis, a 5×5 risk matrix aims to identify the probability and impact levels of injury and risk exposure to a worker concerning workplace hazards. Further, it can serve as a supplementary tool in evaluating the possible damage or disruption brought about by risks.
For CECS, having a tool to visually represent a risk assessment is paramount to effective operations management. Aside from the purpose of objectively rating risks based on their probability of occurrence and impact levels, a 5×5 risk matrix helps provide an easy-to-follow guide for future risk rating processes whenever a new hazard is identified.
This tool allows Environment, Health, and Safety (EHS) professionals to conduct thorough risk assessments, having 5 rating levels for each component for a more accurate analysis.
Table 2: 5×5 Risk Assessment Matrix

Color-coding is crucial for a 5×5 risk assessment matrix template to represent the combination level of probability and impact of the identified risks. That said, high risks must be in red, moderate risks in yellow (amber), and low risks in green. Organizations, EHS professionals, and project managers can then use other closely related colors, such as orange, light red, and light green, to differentiate the specific risk ratings.
A 5×5 risk matrix also aims to answer the question “What are the 5 risk rating levels in the risk assessment matrix?” A 5×5 risk matrix has two axes, or components to put it simply, that make up the whole table or grid: the Probability and the Impact. Under the two are 5 risk rating levels used to calculate risks.
Probability
Also called likelihood, the Probability (x-axis) pertains to the extent of how likely it is for the risk to occur. The 5 risk rating levels under this component are as follows:
- Rare – unlikely to happen and/or have minor or negligible consequences
- Unlikely – possible to happen and/or to have moderate consequences
- Moderate – likely to happen and/or to have serious consequences
- Likely – almost sure to happen and/or to have major consequences
- Almost certain – sure to happen and/or have major consequences
Impact
Also called severity or consequences, the Impact (y-axis) aims to determine the level of effects that the hazard can cause to workplace health and safety.
While a 5×5 risk matrix can be tailored to the needs of an organization, the following represent the general terms used to describe the 5 levels to determine the risk’s impact:
- Insignificant – won’t cause serious injuries or illnesses
- Minor – can cause injuries or illnesses, only to a mild extent
- Significant – can cause injuries or illnesses that may require medical attention but limited treatment
- Major – can cause irreversible injuries or illnesses that require constant medical attention
- Severe – can result in fatality
4.3.1. Step 3 – Control The Risks
Implement control measures and create Standard Operating Procedures (SOP) and training
Once a control measure is identified, the project manager will take steps to implement the control measure into their process before beginning the work. A brief standard operating procedure (SOP) should be completed to document what the correct procedures are for the process, equipment, or substance at hand, and should be able to readily review the SOP. Employees should also be trained, with training documented, on the correct procedures.
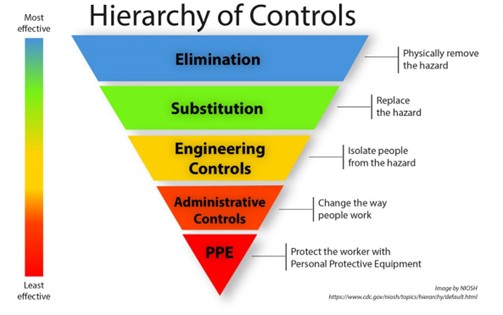
Figure 2: Hierarchy of Controls
Exhibit 1: NIOSH has developed a hierarchy of controls as a means of determining how to implement feasible and effective control solutions to exposures and hazards. Control methods at the top are potentially more effective and protective than those at the bottom. Following this hierarchy normally leads to the implementation of inherently safer systems, where the risk of illness or injury has been substantially reduced.
4.3.1. Step 4 – Review Control Measures
You must review your risk management procedures:
- When controls are not working effectively (or to review the effectiveness of controls);
- When there is a change in the workplace that can impact on the controls;
- If there is a new hazard identified;
- If consultation with workers or others indicates a review is necessary;
- If a health and safety representative requests a review;
- If new information on a hazard becomes available;
- If there is a change in relevant legislation, standards, codes of practice, agreements, guidelines, or procedures;
- Regularly (this will depend on the level of the risk, more serious risks should be reviewed more regularly). To undertake a review, start at step 1 (identify the hazards) again and continue through the rest of the risk management process. If the risk management form requires a significant update ensure that you re-educate all the previous people who signed off on the original form along with any new people, as necessary.
5. Roles and Responsibilities
a. Dean
The Dean of the college is directly responsible for the safety of all departments and units under his/her authority.
b. Vice Dean
Vice Dean is responsible for overseeing the implementation of the safety procedures and policies within the department.
c. Faculty member, Principle Investigator, or Laboratory Manager
The individual is responsible for the safety of people working in his or her laboratory. The responsibility includes compliance with the procedures specified in the Risk Assessment, establishing laboratory-specific operating procedures and policies, and identifying and managing potential risks.